
Google Form exam: make a test that grades itself for free
A Google Form exam is an ordinary Google Form with quiz mode turned on. You add an answer key and points to each question, and Forms marks every submission the moment it arrives. It is free with any Google account, works for a class of ten or a coaching batch of three hundred, and saves you hours of checking. This guide walks through the whole setup, the settings that make cheating harder, and the limits you should know before exam day.
Step 1: turn a Google Form into a quiz
- Go to forms.google.com and create a blank form. Give it a clear title, such as "Class 10 Physics, Unit Test 2".
- Click the Settings tab at the top of the form.
- Turn on Make this a quiz.
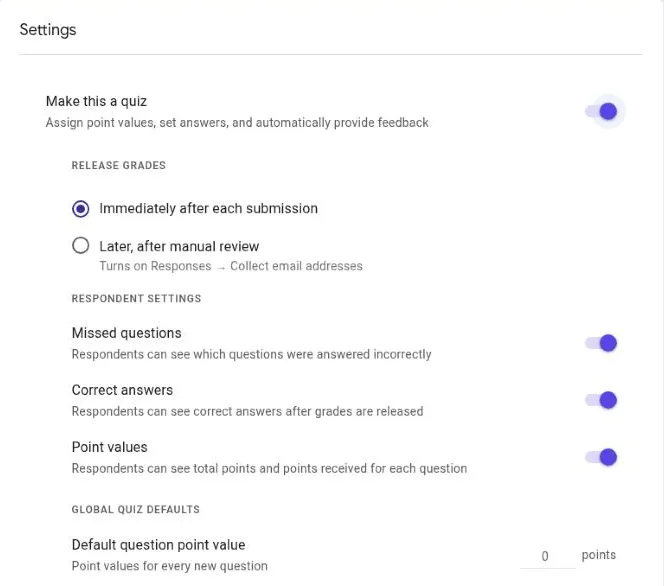
That one switch changes the form. Each question now has an Answer key link and a point value, and the settings page shows new quiz options. Nothing else about the form changes: you still add questions, sections and images the same way.
Before you write questions, add a short first section that asks for the student's name and roll number as required Short answer questions. You will need them to match scores to students later.
Step 2: add questions, an answer key and points
Write each question, then click Answer key at the bottom left of it. Select the correct answer (or answers, for a checkbox question) and set the points at the top right. Click Done to go back to editing.

Forms can grade these question types automatically, according to Google's help page on quizzes (as of November 2026):
- Multiple choice: one correct option. The classic MCQ.
- Checkboxes: several correct options. Say "select all that apply" in the question, so students know to tick more than one.
- Dropdown: like multiple choice, but takes less space for long option lists.
- Short answer: you type the accepted answers. Forms only matches what you typed, so add every form you will accept, for example "7", "seven" and "7 cm".
- Multiple choice grid and Checkbox grid: good for matching questions, such as pairing scientists with their discoveries.
Paragraph questions, file uploads and other long answers can still carry points, but you grade them yourself (see Step 5).
Inside the answer key you will also see Add answer feedback. Use it to explain the right answer or point to the chapter to revisit. Students see it when you release their scores, and it turns a test into a small revision lesson.
Tip for MCQs: open the three dots (More) at the bottom right of a question and choose Shuffle option order. Each student then sees the options in a different order, which makes copying "the answer is C" from a neighbour useless. It works for multiple choice, checkbox and dropdown questions. Don't use it when an option says "All of the above".
Step 3: choose how students get their scores
Go back to Settings and open the quiz options. Under Release grades, Google offers two choices:
- Immediately after each submission: students see their score as soon as they submit. Good for practice tests and homework.
- Later, after manual review: nobody sees anything until you release the scores. Use this for a real exam, so early finishers can't share the answers while others are still writing. Scores can only be released to students whose email address the form collected.
Below that, the respondent settings decide what students can see with their score: the questions they missed, the correct answers and the point values. For a practice test, show everything. For an exam that other batches will take later, hide the correct answers so they don't spread on WhatsApp.
Step 4: settings that make a Google Form exam fairer
No online form can stop a determined student, but a few settings remove the easy shortcuts.
Collect email addresses
In Settings, open Responses and set Collect email addresses. Verified records the Google account the student is signed in with, so nobody can type a friend's address. Responder input lets them type any email, which is easier for students without a Google account but proves nothing.
Limit to 1 response
In the same Responses section, turn on Limit to 1 response. Google's help page is clear about the catch: students must sign in to a Google account to open the form. That is fine for most college classes. For younger children without accounts, you may have to leave it off and check for duplicate names in the results.

Shuffle question order
Under Presentation, turn on Shuffle question order. Each student gets the questions in a different order. Google warns that this mixes everything, so don't use it if question 5 depends on question 4.
Locked mode, only on school Chromebooks
The quiz settings include Locked mode under Chromebook settings. While it is on, students can't open other websites or apps until they submit, and the teacher gets an email if someone leaves the quiz. It only works when every student uses a Chromebook managed by the school and signs in with a Google Workspace for Education account (as of November 2026). It does nothing on Android phones, laptops with Windows or personal Chromebooks, which is how most students in India will take the test. Students without a managed Chromebook may not be able to start a locked quiz at all, so leave it off unless your school has that setup.
Be honest about the limits
On a phone, a student can still take screenshots, ask a friend, or search the question in another app. If the exam really matters, add a fixed time window, questions that need working rather than recall, and a few paragraph questions you read yourself. Treat the online test as one part of the marks, not all of them.
Step 5: check results and grade by hand
Open the Responses tab once students start submitting. It has three views:
- Summary: the average, the score spread and the questions most students got wrong. That last list tells you what to teach again.
- Question: one question at a time, with every answer to it. For a short answer, this is the quickest way to mark an unexpected but correct answer, such as a spelling you didn't put in the key, as right. Click Save when you finish.
- Individual: one student at a time. Move with the arrows, type points for paragraph questions, add feedback and click Save.
If you chose to release grades later, click Release score in the Individual view, tick the students to notify and click Send emails and release. Each student gets an email with a link to their marked paper.
Step 6: send the marks to Google Sheets
In the Responses tab, click Link to Sheets and create a new spreadsheet. Every submission becomes a row, with the student's answers, a timestamp and a score column. From there you can sort by roll number, calculate a class average, or add marks from the written part of the exam.
To share the marks list with the principal or put it on the notice board, hide the columns with individual answers and convert Google Sheets to PDF with Fit to width, so every column ends up on one page.
Making a Google Form exam on an Android phone
Google Forms has no Android app. Google's help page tells you to open forms.google.com in a mobile browser such as Chrome, and lists creating and grading quizzes among the things you can do there. In practice, writing twenty questions on a small screen is slow. A good workflow is to type the questions in Google Docs on your phone, copy them into the form, and finish the settings on a computer when you get the chance.
If you teach in two languages, you can write the paper in English and translate a document in Google Docs to get a Hindi or Tamil copy. Read every translated question before pasting it into the form: a machine translation that changes the meaning of a question changes the answer too.
Students can take the exam on any phone. Share the link from the Send button.
A checklist before exam day
- Take the quiz yourself from another account, or ask a colleague, and check that the score is right.
- Check every short answer key for spellings and units students might use.
- Confirm the release setting: immediately for practice, later for exams.
- Decide on email collection and Limit to 1 response, and tell students to sign in before the start time.
- When time is up, open Responses and turn off Accepting responses, so late submissions are blocked.
Frequently asked questions
Is a Google Form exam free?
Yes. Quiz mode, answer keys, automatic grading and linking to Google Sheets all work with a free personal Google account. Locked mode is the exception: it needs Google Workspace for Education and school-managed Chromebooks.
Can I set a time limit on a Google Form quiz?
Google Forms has no built-in timer for each student. You can announce a time window and turn off Accepting responses when it ends. Third-party add-ons add timers, but check what data they collect before using one with students.
Do students need a Google account to take the quiz?
Only if you turn on Limit to 1 response, Verified email collection or a file upload question. Without those, anyone with the link can answer.
One search tip a week, plus our new guides: follow dedigger on WhatsApp.